This baked spring rolls recipe came from a need to enjoy that crispy, satisfying crunch without the greasy aftermath of deep frying. I wanted something healthier but still full of flavor, so I started experimenting with oven baking. It’s surprisingly simple, and the smell of toasted sesame and garlic as they bake is almost as good as the bites themselves.
There’s a kind of quiet triumph in pulling a tray of golden, crisp spring rolls from the oven. It feels more honest, more straightforward, than standing over a hot fryer. Plus, this method means I can make a batch, share them easily, and not worry about the mess or excess oil. It’s become my go-to for quick weeknight dinners or when I want something crunchy that’s still kind of virtuous.
This recipe rethinks spring rolls as a healthier, oven-baked option, perfect for those avoiding deep frying but still craving crispy, flavorful bites. It’s about capturing that satisfying crunch without the greasy mess, making it a weekday hero.
The inspiration behind this dish
- This recipe was born out of a desire to enjoy spring rolls without the heavy oil and fuss of frying. I remember the first time I baked them, the kitchen filled with a warm, toasty aroma that made me forget about traditional methods. It’s funny how a small tweak in technique can completely change the way you experience a dish.
- I started experimenting when friends kept asking for healthier options that still deliver on crunch and flavor. Baking seemed like the perfect way to keep that satisfying texture without the guilt. Over time, I found that the oven’s gentle heat helps the filling stay moist while the wrapper crisps up beautifully, almost like a magic trick.
- heading:
Key ingredients and tips
- Rice paper wrappers: I love how they turn crispy in the oven, but make sure to soak them just enough to avoid tearing. Try a quick dip in warm water—no more than 10 seconds. They should be flexible but not soggy.
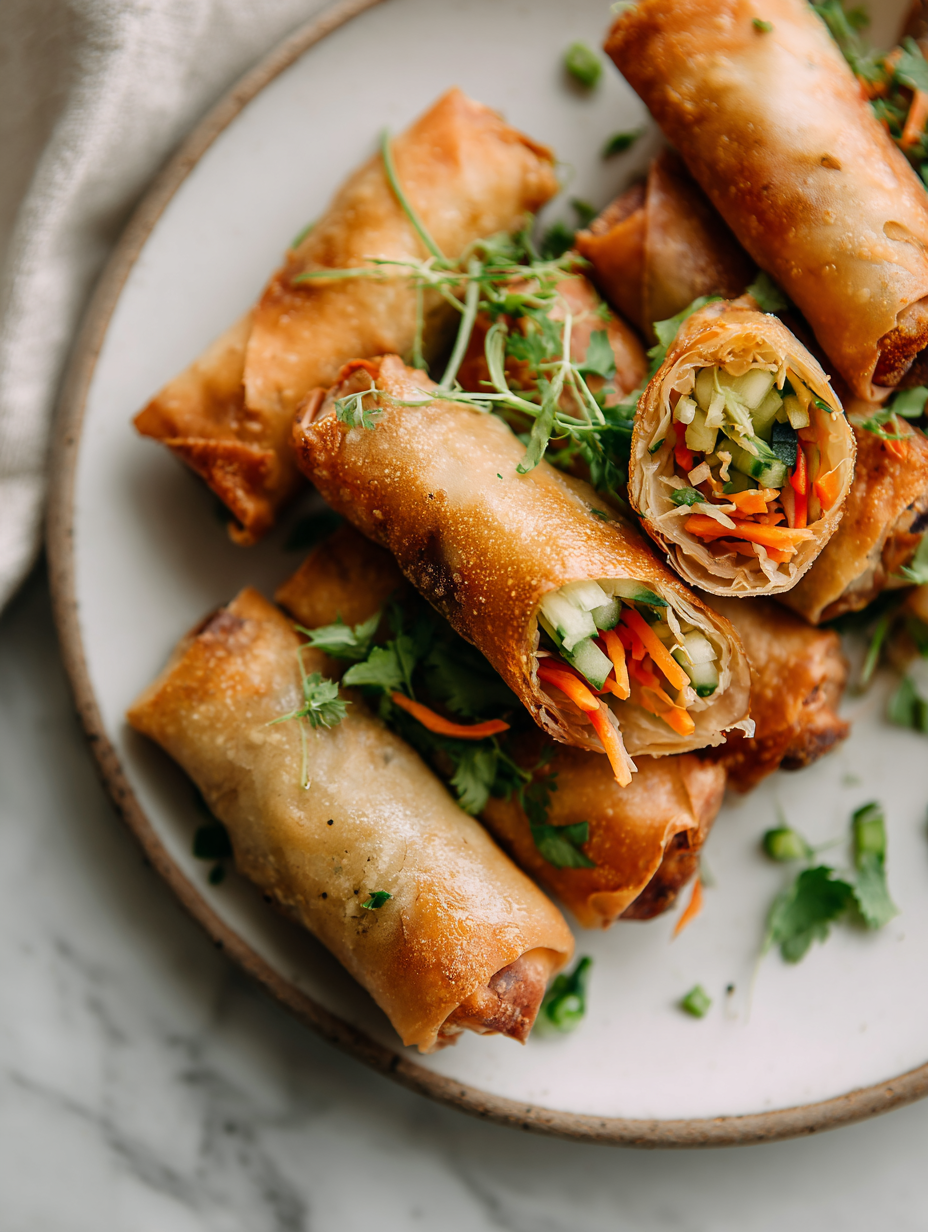
- Shredded vegetables: Carrots, cabbage, and bean sprouts bring a fresh crunch. I prefer a mix with a bit of bite, so don’t overcook the cabbage before wrapping. Keep them raw or just lightly sauté for extra flavor.
- Cooked protein: Ground chicken or shrimp works best. I like to season and pre-cook my filling—smoky soy, a touch of sesame oil—before wrapping. It keeps things juicy and flavorful inside.
- Seasonings: A splash of soy sauce, a dash of rice vinegar, and a pinch of five-spice. These blend into the filling and give it that savory, umami kick. Adjust to your taste—more vinegar for brightness, less for subtlety.
- Oil spray: Just a light coating before baking. It helps the wrappers crisp evenly and gives that golden hue. Too much and they’ll feel greasy, so a quick spray is enough. Watch for the crackling sound in the oven.
- Optional herbs: Fresh cilantro or mint add a burst of brightness. I sprinkle these after baking for a fresh contrast. Avoid adding them inside the filling—they can wilt or turn bitter in the oven.
- Dipping sauce: Sweet chili or soy-based. I prefer a quick mix of hoisin, lime, and a dash of sriracha. It’s the perfect dip to complement the crispy bites and add a zing of flavor.
Spotlight on key ingredients
Rice paper wrappers:
- I love how they turn crispy in the oven, but make sure to soak them just enough to avoid tearing. Try a quick dip in warm water—no more than 10 seconds. They should be flexible but not soggy.
- Shredded vegetables: Carrots, cabbage, and bean sprouts bring a fresh crunch. I prefer a mix with a bit of bite, so don’t overcook the cabbage before wrapping. Keep them raw or just lightly sauté for extra flavor.
Cooked protein:
- Ground chicken or shrimp works best. I like to season and pre-cook my filling—smoky soy, a touch of sesame oil—before wrapping. It keeps things juicy and flavorful inside.
- Seasonings: A splash of soy sauce, a dash of rice vinegar, and a pinch of five-spice. These blend into the filling and give it that savory, umami kick. Adjust to your taste—more vinegar for brightness, less for subtlety.
Notes for ingredient swaps
- Rice paper wrappers: I prefer the thin, almost translucent ones for a delicate crunch. If you can’t find them, rice flour sheets work but will be sturdier and denser.
- Vegetables: Feel free to swap shredded carrots and cabbage with julienned zucchini or bell peppers for a different crunch and sweetness, especially in spring or summer.
- Protein: Ground pork or firm tofu can replace chicken or shrimp. Tofu needs pressing and a quick fry to get crispy, which adds a different texture.
- Seasonings: Swap soy sauce for tamari for a gluten-free version, or add a splash of fish sauce for extra umami. A dash of sesame oil brings smoky depth, but you can skip it if allergic.
- Oil spray: Use avocado or light olive oil spray if sesame or peanut oils are not available. They give a similar golden finish without strong flavors.
- Herbs: Fresh basil or mint can be substituted for cilantro for a different herbal note. Dried herbs won’t give the same brightness, so add just before baking.
- Dipping sauce: Hoisin can be replaced with a sweet plum sauce or a spicy peanut sauce. Adjust sweetness and spice levels to your taste, but aim for that zingy contrast.
Equipment & Tools
- Baking sheet: To hold the rolls during baking and ensure even heat distribution.
- Pastry brush: To lightly oil the rolls for a crispy, golden surface.
- Large shallow dish: For soaking rice paper wrappers quickly and evenly.
- Wire rack: To cool and prevent sogginess after baking.
Step-by-step guide to baked spring rolls
- Equipment & Tools: Gather a baking sheet, a pastry brush, a large shallow dish for soaking, and a wire rack for cooling. These keep your process smooth and your rolls crispy.
- Preheat oven to 200°C (390°F). Line your baking sheet with parchment paper for easy cleanup and even baking.
- Prepare filling: Cook shredded chicken or shrimp with soy, garlic, and sesame oil. Let cool slightly, then set aside.
- Soak rice paper wrappers: Dip each wrapper in warm water for about 8-10 seconds until flexible. Drain and lay flat on a damp towel.
- Assemble rolls: Place a small spoonful of filling near the bottom of each wrapper. Fold in sides, then roll tightly from bottom to top, sealing with a dab of water if needed.
- Place rolls seam-side down on the prepared baking sheet. Spray lightly with oil for a golden finish.
- Bake: Place in the oven for 15-20 minutes, turning halfway through. Watch for a golden, crisp exterior and fragrant aroma.
- Check for doneness: Rolls should be golden brown, crispy, and the filling should be hot and steaming inside. If not, bake a few more minutes.
- Rest & Serve: Let baked rolls rest for 5 minutes. Serve warm with dipping sauce and fresh herbs if desired.
Let the rolls rest for 5 minutes before serving to allow the filling to set. Plate with dipping sauces and herbs for a fresh finish.
How to Know It’s Done
- Golden, crispy exterior with even browning.
- Filling hot and steamy without excess moisture.
- Wrapper intact, not torn or soggy.
Oven-Baked Spring Rolls
Ingredients
Equipment
Method
- Gather a baking sheet, a large shallow dish filled with warm water, a pastry brush, and a wire rack for cooling. Preheat your oven to 200°C (390°F) and line the baking sheet with parchment paper.
- Cook ground chicken or shrimp in a skillet with soy sauce, sesame oil, and a pinch of five-spice until fully cooked and fragrant. Let the filling cool slightly so it’s easy to handle.
- Dip a rice paper wrapper into the warm water for about 8-10 seconds until it becomes flexible but not soggy. Carefully lay it on a damp towel or plate.
- Place a small spoonful of the cooked filling near the bottom edge of the wrapper. Spread it out slightly, leaving space on the sides for folding.
- Fold in the sides of the wrapper, then roll tightly from bottom to top, sealing the edge with a dab of water if needed. Repeat with remaining wrappers and filling.
- Place the assembled rolls seam-side down on the prepared baking sheet. Lightly spray the tops with oil to promote golden crispness.
- Bake in the oven for 15-20 minutes, turning halfway, until the rolls are golden brown and crispy, and the kitchen smells toasted and savory.
- Remove the rolls from the oven and let them rest for 5 minutes on a wire rack. This helps the crispness set and makes them easier to handle.
- Serve the spring rolls warm with your favorite dipping sauce, garnished with fresh cilantro or mint if desired. Enjoy the satisfying crunch and fragrant aroma!
Notes
Pro tips for perfect baked spring rolls
- Use a light oil spray to achieve an even, golden crust without greasiness.
- Soak rice paper just until bendable—over-soaking makes tearing more likely, so keep it quick.
- Assemble rolls on a damp towel to prevent sticking and ensure easy handling.
- Bake at 200°C (390°F) and turn halfway; look for a uniform, crispy surface with a fragrant aroma.
- Rest baked rolls for 5 minutes; this helps filling set and makes them easier to dip and eat.
- Keep an eye on the color—once golden-brown, it’s time to pull them out before they over-torch.
- For extra crispiness, give a quick spray of oil before baking—this creates a beautiful, crackly exterior.
Common baking mistakes and how to fix them
- FORGOT to preheat the oven → Always preheat to ensure even crispness.
- DUMPED filling too early → Let the rolls rest 5 minutes for setting and easier handling.
- OVER-TORCHED the wrappers → Watch for golden edges; remove once crispy to avoid bitterness.
- SKIPPED oil spray → Lightly spray rolls before baking for a uniform golden color.
Quick fixes and pantry swaps
- When rolls crackle loudly, they’re over-dried; spray lightly with water and bake briefly again.
- If filling leaks out, seal edges better with a damp finger or a touch of water.
- Splash a few drops of vinegar if the filling tastes flat or dull.
- Patch torn wrappers with a tiny dab of water before assembling again.
- Shield delicate rolls from direct oven heat with foil if they brown unevenly.
Prep, store, and reheat tips
- You can prepare the filling and soak the rice paper wrappers a few hours in advance. Keep them covered in the fridge to prevent drying out.
- Assemble the rolls a day ahead, then store them in an airtight container lined with parchment to prevent sticking. They stay good for up to 24 hours in the fridge.
- Reheat in a 180°C (350°F) oven for about 8-10 minutes until crispy and heated through. The smell of toasted sesame will tell you they’re ready.
- For longer storage, freeze the unbaked rolls on a tray, then transfer to a bag. Bake directly from frozen, adding 5-7 minutes, until golden and crispy.
Top questions about baked spring rolls
1. How do I prevent rice paper from tearing?
Use rice paper that’s thin and translucent. Soak them just until flexible, about 8-10 seconds, to prevent tearing.
2. How can I tell when the spring rolls are done?
You want the filling to be moist but not dripping, and the wrappers golden and crispy after baking.
3. What’s the best oven temperature and time?
Preheat your oven to 200°C (390°F). Bake for 15-20 minutes, turning halfway, until they’re golden brown and crispy.
4. My rolls aren’t crispy enough, what now?
If they’re not crispy enough, spray lightly with oil and bake a few more minutes. If over-browned, cover loosely with foil.
5. Can I prepare these in advance?
You can prep the filling and soak wrappers ahead, store assembled rolls in the fridge up to a day, or freeze unbaked for longer storage.
6. How do I get a crisp, golden finish?
Use a light oil spray before baking to help achieve an even, golden exterior without greasiness.
7. What if the filling leaks out during baking?
If the filling leaks, make sure to seal the edges well with a damp finger or water before baking.
8. Can I add different herbs or sauces?
For extra flavor, add herbs like cilantro or mint after baking, and serve with a zingy dipping sauce.
9. Why are my rolls crackling excessively?
If your rolls crackle loudly in the oven, they might be over-dried. Spray with a little water and bake briefly again.
10. Any tips for assembling the rolls smoothly?
When assembling, keep the wrappers damp and work quickly to prevent tearing. Rest the baked rolls for 5 minutes before serving.
Baked spring rolls feel like a quiet victory in the kitchen, crispy and golden without the oil mess. They’re simple enough for a weeknight but special enough to serve to friends. I keep coming back to this method because it’s honest, straightforward, and just plain good.
In a world of complicated recipes, these baked bites remind me that sometimes, less is more. The smell of toasted sesame and fresh vegetables, the satisfying crunch—these are the small moments I savor. It’s a humble dish that somehow makes everything feel a little more manageable.

Hi, I’m Michael Anderson, the voice behind Overreacting To Salt. Yes, the name usually gets a laugh. And no, I am not actually afraid of salt. In fact, understanding salt and flavor balance is what inspired this entire blog.
 The voice behind Overreacting To Salt. Yes, the name usually gets a laugh. And no, I am not actually afraid of salt. In fact, understanding salt and flavor balance is what inspired this entire blog.
Overreacting To Salt is my space to talk honestly about cooking mistakes, kitchen wins, and the small details that make a big difference in flavor. I created it for home cooks who want to understand food better without feeling intimidated.
The voice behind Overreacting To Salt. Yes, the name usually gets a laugh. And no, I am not actually afraid of salt. In fact, understanding salt and flavor balance is what inspired this entire blog.
Overreacting To Salt is my space to talk honestly about cooking mistakes, kitchen wins, and the small details that make a big difference in flavor. I created it for home cooks who want to understand food better without feeling intimidated.


