Chicken wings often get all the spotlight for their crispy skin and sticky glaze, but it’s that thin caramelized layer of sugar and spice that really makes them sing. I’ve spent years trying to crack the code for that perfect balance—crisp, sticky, with just the right hint of heat and sweetness—and I think I finally nailed it without fussing over fancy ingredients.
This recipe is my go-to when I want wings that hit that sweet spot every time. It’s not about deep-frying or complicated marinades; it’s about simple tricks that turn ordinary wings into something truly crave-worthy. The secret is in how you coat and cook them, and I’ll walk you through what makes that coating stick and caramelize just right.
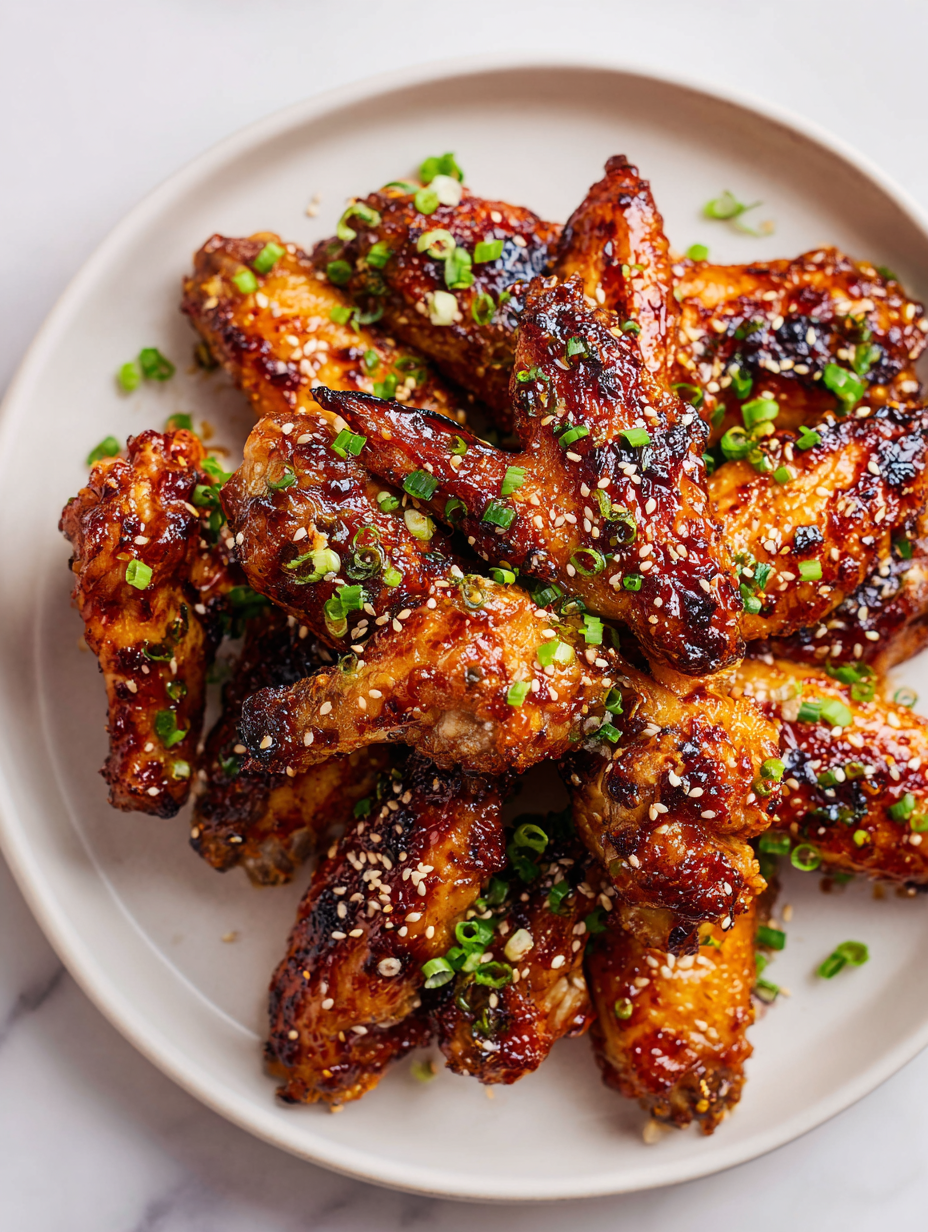
If you’ve ever enjoyed wings that are crispy and gooey at the same time, you know what I’m talking about. It’s that irresistible contrast—crunch with a sticky, smoky glaze—that keeps me coming back for more. This recipe is my honest attempt to share those little tricks, so you can get that perfect, crave-worthy bite every time.
Focusing on the overlooked importance of the crispy, sticky coating—how that thin layer of caramelized sugar and spice transforms chicken wings from simple to crave-worthy, and the little tricks to perfect it every time.
The art of sticky, crispy wings
- Cracking that perfect sticky glaze took me years, but now it’s a simple, almost meditative process.
- Nothing beats the rush of biting into wings with that initial crunch, followed by the sweet, smoky coating.
- These wings remind me of summer barbecues, even when it’s cold outside, because they bring that nostalgic, messy joy.
- Sharing this recipe feels like passing down a secret—one that turns ordinary wings into a memorable snack.
The story behind this recipe
- This recipe came from a messy, late-night kitchen experiment. I was craving wings that had a real punch—something crispy, sticky, but not overly sweet. I kept tweaking the spice mix and the cooking process until I hit that perfect balance of caramelized coating and tender meat. It’s funny how a simple craving can lead to a recipe you actually want to write down and keep coming back to.
- I remember the first time I nailed that crunch and stickiness—it was like a small victory. Now, I rely on these tricks whenever I want wings that deliver that satisfying crackle and a smoky, sweet glaze that clings just right. It’s not about fancy ingredients, just honest techniques, and a little patience.
- heading: ‘The story behind this recipe’
Trivia and origins of chicken wings
- Chicken wings as a dish gained popularity in the United States during the 1960s, notably at anchor bars in Buffalo, New York.
- The buffalo wing’s spicy, tangy sauce was reportedly invented by Teressa Bellissimo, who coated fried wings in her signature hot sauce blend.
- Initially considered a bar snack, chicken wings became a nationwide phenomenon, evolving into countless regional variations and flavor profiles.
- The term ‘wing night’ became a cultural staple, often associated with sports viewing and social gatherings, fueling their rise in popularity.
Ingredient breakdown
- Chicken wings: I prefer drums and flats for that balance of meat and skin, but make sure they’re patted dry—moisture is enemy number one for crispiness.
- Soy sauce: Adds umami depth and helps the coating stick, but if you need gluten-free, swap with coconut aminos—just watch for a slightly sweeter note.
- Brown sugar: This is the secret to that caramelized, sticky finish—don’t skip it or the glaze will fall flat and less glossy.
- Paprika: I love smoked paprika here—it gives a rich, smoky aroma that really elevates the glaze, but regular sweet paprika works if you want a milder flavor.
- Hot sauce: Use your favorite, but I swear Frank’s gives that classic tang—add a splash more if you want more heat or tang, but beware of overpowering the sweetness.
- Garlic powder: It’s the backbone of flavor—make sure it’s fresh or it can taste dull, and consider adding a pinch of onion powder for extra complexity.
- Cooking oil: I use vegetable or canola for high heat, but if you’re frying, a good splash of peanut oil adds a subtle nutty hint and high smoke point.
Spotlight on key ingredients
Chicken wings:
- I prefer drums and flats for that balance of meat and skin, but make sure they’re patted dry—moisture is enemy number one for crispiness.
- Soy sauce: Adds umami depth and helps the coating stick, but if you need gluten-free, swap with coconut aminos—just watch for a slightly sweeter note.
- Brown sugar: This is the secret to that caramelized, sticky finish—don’t skip it or the glaze will fall flat and less glossy.
Hot sauce and spices:
- Hot sauce: Use your favorite, but I swear Frank’s gives that classic tang—add a splash more if you want more heat or tang, but beware of overpowering the sweetness.
- Paprika: I love smoked paprika here—it gives a rich, smoky aroma that really elevates the glaze, but regular sweet paprika works if you want a milder flavor.
- Garlic powder: It’s the backbone of flavor—make sure it’s fresh or it can taste dull, and consider adding a pinch of onion powder for extra complexity.
Notes for ingredient swaps
- Dairy-Free: Swap milk or butter with coconut milk or olive oil—less creamy, but still rich in flavor.
- Sweetener: Replace brown sugar with honey or maple syrup—adds a different depth and a slightly different sticky texture.
- Hot Sauce: Use sriracha or chipotle sauce for a smokier kick—less tangy, more smoky heat.
- Soy Sauce: Swap with coconut aminos—gluten-free, milder, slightly sweeter, but still umami-rich.
- Oil: Use avocado or grapeseed oil—high smoke points and neutral flavor, perfect for roasting or frying.
- Vinegar: Replace with apple cider vinegar for a fruitier tang—brings brightness without overpowering.
- Herbs & Spices: Use smoked paprika or cayenne for extra smoky or spicy notes—adjust quantity to taste.
Equipment & Tools
- Large baking sheet: To hold the wings during baking and ensure even heat distribution.
- Wire rack: Elevates the wings for optimal air circulation and crispiness.
- Mixing bowls: To prepare and toss the coating mixture and wings.
- Tongs: To turn and handle wings without breaking the coating.
- Silicone brush: To brush additional glaze or hot sauce onto the wings after baking.
Step-by-step guide to crispy wings
- Equipment & Tools: Gather a large baking sheet, wire rack, mixing bowls, tongs, and a silicone brush. The wire rack helps air circulate for crispiness, while tongs keep hands clean.
- Pat the chicken wings dry with paper towels. Excess moisture is the enemy of crisp skin. Set aside in a bowl.
- Prepare the coating: Mix soy sauce, a tablespoon of brown sugar, smoked paprika, garlic powder, and hot sauce in a bowl. This creates a sticky, flavorful glaze.
- Toss the wings in the coating, making sure each piece is evenly coated. Use tongs or your hands—just wear gloves if you dislike sticky fingers.
- Preheat your oven to 220°C (430°F). Line the baking sheet with parchment, then place the wire rack on top. This setup promotes even crisping.
- Arrange the coated wings on the wire rack, spacing them out. Avoid overcrowding to prevent steaming. Bake for 40-45 minutes.
- Halfway through, flip the wings with tongs. Check for even browning and crispness. If edges are burning, lower the heat slightly.
- When the wings are golden and crackling at the edges, they’re ready. The glaze should be bubbly and slightly caramelized. If not, give them a few more minutes.
- Rest the wings for 5 minutes on the rack. This helps set the glaze and keeps them crispy. Then, brush with a little more hot sauce if desired.
- Serve immediately, with extra hot sauce or your favorite dip. The wings should be crispy outside, moist inside, with a sticky, smoky glaze.
Let the wings rest on the rack for 5 minutes to set the glaze. Serve hot, with your favorite dips or extra hot sauce brushed on top for an added kick.
How to Know It’s Done
- Wings are golden brown and crackling at the edges.
- The glaze appears bubbly and has caramelized slightly.
- Internal temperature reaches at least 75°C (165°F) for safe eating.
Crispy Sticky Chicken Wings
Ingredients
Equipment
Method
- Preheat your oven to 220°C (430°F) and line a large baking sheet with parchment paper. Place a wire rack on top to allow hot air circulation for crisping.
- Pat the chicken wings thoroughly dry with paper towels until they feel slightly tacky but not moist—this step is key to achieving crispy skin.
- In a mixing bowl, combine soy sauce, brown sugar, smoked paprika, hot sauce, and garlic powder. Stir until the sugar dissolves and the mixture is fragrant.
- Add the wings to the bowl and toss them in the glaze, making sure each piece is evenly coated. Use tongs to handle the wings for a clean and thorough coat.
- Arrange the coated wings on the prepared wire rack, spacing them out to prevent overcrowding. This allows hot air to circulate and helps them crisp evenly.
- Bake for 40 to 45 minutes, flipping the wings halfway through to ensure even browning and crispness. You’ll hear a gentle crackle and see golden edges forming.
- Once the wings are deeply golden and bubbling at the edges, remove them from the oven. The glaze should look shiny and slightly caramelized.
- Use a silicone brush to lightly brush additional hot sauce onto the wings for extra shine and flavor. Let them rest on the rack for 5 minutes to set the glaze and maintain their crispiness.
- Serve immediately, enjoying the crisp exterior with a sticky, smoky, sweet glaze. These wings are best eaten hot, with extra hot sauce or your favorite dip on the side.
Tips for perfect wings
- Bolded mini-head: Use a wire rack → Elevates wings for even crisping and prevents sogginess.
- Bolded mini-head: Pat wings dry → Ensures the coating sticks and crisps up properly, avoiding steam.
- Bolded mini-head: Toss in coating while slightly warm → Helps the glaze cling and caramelize better.
- Bolded mini-head: Flip wings halfway → Promotes uniform browning and prevents burning on one side.
- Bolded mini-head: Bake at high heat (220°C/430°F) → Achieves that crackly, golden exterior without frying.
- Bolded mini-head: Rest wings briefly after baking → Sets the glaze and keeps wings crispy, not sticky.
- Bolded mini-head: Brush extra hot sauce post-bake → Adds shine and an extra layer of flavor for the perfect finish.
Common mistakes and how to fix them
- FORGOT to dry wings, resulting in soggy coating—pat thoroughly before coating.
- DUMPED excess marinade, which prevented proper caramelization—leave a little for better glaze.
- OVER-TORCHED the wings, making them bitter—lower heat or shorten cooking time if edges darken.
- UNDERESTIMATED resting time, causing glaze to slide off—rest on rack for 5 minutes for set.
Quick fixes and pantry swaps
- When wings stick, splash cold water on the glaze to loosen and rescue the coating.
- If glaze is too runny, quick-dip wings in hot sugar syrup to thicken and add shine.
- DUMPED excess marinade? Pat wings dry before baking for better crispness.
- Over-torched wings? Shield edges with foil and lower oven temp slightly.
- If wings are soggy after reheating, blast them at 220°C (430°F) for 5 minutes to re-crisp and shimmer.
Prep, store, and reheat tips
- You can prep the wings a day ahead by coating them and keeping in the fridge—just let them come to room temp before baking for even crisping.
- Store cooked wings in an airtight container in the fridge for up to 3 days. Reheat in the oven at 180°C (350°F) until crispy and hot, about 10 minutes, watching for steam and checking for crunch.
- For freezing, lay wings on a tray, freeze until solid, then transfer to a zip-top bag. They keep well for up to 1 month, but the glaze may lose some of its shine upon thawing.
- Reheat directly from frozen in a hot oven. Expect a slightly less sticky glaze, but the crispiness will come back if you give them enough heat—look for crackle and aroma of smoky spices.
Top questions about chicken wings
1. How do I get crispy wings without frying?
Pat the wings completely dry with paper towels before coating. Moisture prevents crispiness and makes the coating soggy.
2. What’s the best oven temp for crispy wings?
Bake at a high temperature, around 220°C (430°F), on a wire rack. This allows hot air to circulate and crisp the skin.
3. How do I make the glaze stick better?
Use a sticky glaze made with soy, sugar, and hot sauce, then brush on post-baking for extra shine and flavor.
4. How can I control the spiciness?
Adjust the hot sauce level to your heat preference. For milder wings, reduce hot sauce or add more sweetener.
5. Should I rest the wings before serving?
Rest the wings for 5 minutes after baking. This helps set the glaze and keeps them crispy longer.
6. How do I reheat wings without losing crispness?
Store leftovers in an airtight container in the fridge for up to 3 days. Reheat in the oven until crispy, about 10 minutes at 180°C (350°F).
7. Can I freeze cooked wings?
Frozen wings can be stored for up to a month. Bake directly from frozen, adding 5–10 minutes for reheating.
8. What spice can I add for smoky flavor?
For extra smoky flavor, use smoked paprika in the coating. It adds depth and aroma that elevates the glaze.
9. How do I prevent wings from sticking together or uneven cooking?
Ensure wings are evenly coated and not overcrowded on the baking sheet for uniform crispiness.
10. How can I fix soggy wings after baking?
If wings are too greasy, give them a quick blast in the oven at high heat to re-crisp the outside.
These wings are more than just a snack; they carry stories of late-night experiments and childhood barbecues. Every crispy, sticky bite reminds me why I love cooking—simple ingredients, honest techniques, and that satisfying crackle. Right now, with the season’s craving for comfort and bold flavors, they feel like exactly what’s needed to bring a little messy joy to the table. Enjoy every bite, and don’t forget to savor those little moments of perfect crunch and smoky sweetness. After all, it’s these small wins in the kitchen that keep the love for cooking alive. Happy wings-ing!
And when the plate’s empty, and the house quiets down, I find myself already thinking about the next batch—how to tweak the spice, add a new glaze, or just get that crispy skin just right again. That’s the beauty of a good wing recipe; it’s never really finished, just waiting for the next round. So, keep experimenting, keep tasting, and enjoy every messy, glorious bite.

Hi, I’m Michael Anderson, the voice behind Overreacting To Salt. Yes, the name usually gets a laugh. And no, I am not actually afraid of salt. In fact, understanding salt and flavor balance is what inspired this entire blog.
 The voice behind Overreacting To Salt. Yes, the name usually gets a laugh. And no, I am not actually afraid of salt. In fact, understanding salt and flavor balance is what inspired this entire blog.
Overreacting To Salt is my space to talk honestly about cooking mistakes, kitchen wins, and the small details that make a big difference in flavor. I created it for home cooks who want to understand food better without feeling intimidated.
The voice behind Overreacting To Salt. Yes, the name usually gets a laugh. And no, I am not actually afraid of salt. In fact, understanding salt and flavor balance is what inspired this entire blog.
Overreacting To Salt is my space to talk honestly about cooking mistakes, kitchen wins, and the small details that make a big difference in flavor. I created it for home cooks who want to understand food better without feeling intimidated.


