Switching out deep frying for baking transforms the familiar samosa into a lighter, weeknight-friendly snack. I love the way the oven gives the pastry a crisp, flaky texture without the greasy aftermath, making it feel almost indulgent but still manageable on a busy evening.
This version is perfect for those who crave that warm, spicy filling and crispy crust but want to avoid the mess and excess oil. Plus, baking means I can make a batch and feel good about leftovers—no re-heating oil splatters involved.
Getting the filling just right—spicy, savory, with a hint of freshness—paired with a sturdy yet tender crust, makes these baked samosas a go-to for me. They’re a little bit nostalgic, a little bit health-conscious, and totally satisfying without the fried fuss.
This recipe flips the traditional fried samosa into a healthier, oven-baked version, making it accessible for weeknight dinners and those avoiding deep frying without sacrificing flavor or texture.
The story behind this recipe
- This recipe came about during a busy week when I craved the comfort of samosas but didn’t want to deal with the mess of deep frying. I started experimenting with baking, aiming for that same crispy crust and spicy filling but with less fuss and oil. Turns out, the oven gave the pastry a beautiful crunch that surprised me, and I could make a big batch without feeling overwhelmed.
- Every time I make these, I think about how food can be both nostalgic and adaptable. It became a little project to create something familiar in a healthier way, and I love how they remind me of street food stalls but in my own kitchen.
- heading: The story behind this recipe
Ingredient breakdown: key components
- Potatoes: I mash them until smooth, offering a creamy base that balances the spices. For a firmer filling, leave a few small chunks for texture.
- Peas: I like adding fresh or frozen peas—they burst with sweetness and brighten the filling, but feel free to skip if you want a more subdued flavor.
- Spices: I toast cumin seeds briefly until fragrant—this step deepens the aroma and boosts flavor. Don’t skip it, even if you’re in a rush.
- Pastry: I prefer a store-bought puff pastry for ease, but homemade flaky dough works beautifully if you have time. The key is keeping it cold to prevent tearing.
- Oil for brushing: I use a light coating to give the baked samosas a subtle sheen and crispness, but too much can make them greasy, so be gentle.
- Lemon juice: I splash a little in the filling for brightness, and you can add more if you like a tangy kick—just a squeeze, no more.
- Egg wash (optional): I brush the crust lightly for a golden finish, but if you’re vegan, a bit of plant-based milk works just as well.
Spotlight on key ingredients
Potatoes and peas:
- Potatoes: I mash them until smooth, offering a creamy base that balances the spices. For a firmer filling, leave a few small chunks for texture.
- Peas: I like adding fresh or frozen peas—they burst with sweetness and brighten the filling, but feel free to skip if you want a more subdued flavor.
Notes for ingredient swaps
- Vegan Cheese: Swap dairy cheese for a nut-based or plant-based version. Expect a slightly softer, less melt-y texture but still flavorful.
- Vegetables: Use sweet potatoes instead of regular potatoes for a sweeter, creamier filling. Roasted carrots or zucchini can add freshness.
- Spices: If you don’t have garam masala, try curry powder or a mix of cumin and coriander. The flavor will be different but still warm and aromatic.
- Pastry: For a gluten-free option, try rice paper or gluten-free puff pastry. Keep in mind these may alter the crispness or structure.
- Oil for brushing: Use olive oil or avocado oil for a more neutral, slightly fruity finish. Light brushing is best to avoid greasiness.
- Lemon juice: Lime juice works well too, offering a slightly different brightness but maintaining that fresh, tangy note.
- Egg wash: For vegan finishing, brush with plant-based milk or a light maple syrup glaze to get that golden, shiny crust.
Equipment & Tools
- Baking sheet: Holds the samosas during baking to ensure even heat.
- Parchment paper or silicone mat: Prevents sticking and makes cleanup easier.
- Rolling pin: Rolls out pastry evenly to about 3 mm (1/8 inch) thickness.
- Knife or dough cutter: Cuts pastry into uniform shapes.
- Fork: Crimps edges to seal the samosas securely.
- Skillet or frying pan: To toast spices and cook the filling.
Step-by-step guide to baked samosas
- Preheat your oven to 200°C (390°F). Line a baking sheet with parchment paper or a silicone mat. Set aside.
- Prepare the filling: In a skillet over medium heat, warm a teaspoon of oil. Add cumin seeds, let them crackle for about 30 seconds until fragrant.
- Add finely chopped onions and cook until translucent, about 3-4 minutes. Stir in spices: turmeric, garam masala, chili powder. Cook for another minute.
- Mix in mashed potatoes, peas, a squeeze of lemon juice, and salt. Stir well to combine. Taste and adjust seasoning as needed.
- Roll out your puff pastry on a lightly floured surface. Cut into 8-10 rectangles or circles, about 8×8 cm (3×3 inches).
- Spoon about 1-2 tablespoons of filling onto one side of each pastry piece. Fold over to form a triangle or semi-circle. Press edges to seal with a fork.
- Place samosas on the prepared baking sheet, leaving space between each. Brush the tops lightly with oil for a golden sheen.
- Bake for 20-25 minutes, or until the crust is puffed, golden, and crispy. Check at 20 minutes; if not golden enough, bake a few minutes longer.
- Remove from oven and let rest for 5 minutes. Serve warm, with a side of tangy chutney or yogurt if desired.
Let the baked samosas rest for 5 minutes on a wire rack before serving. Serve warm with chutney or yogurt. They’re best enjoyed fresh but keep leftovers in an airtight container at room temperature for up to a day.
How to Know It’s Done
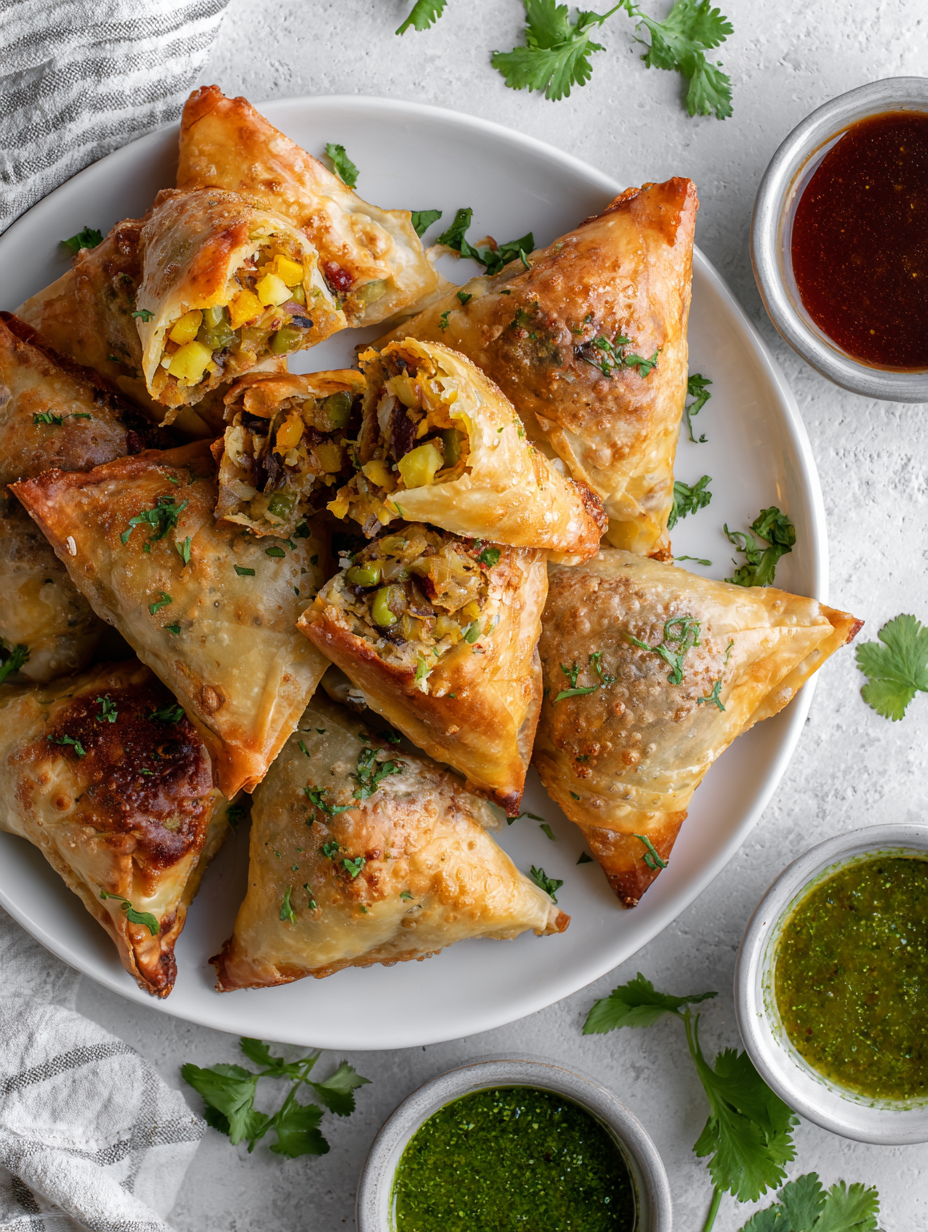
- Samosas are golden and crispy with a puffed crust.
- Filling is hot, fragrant, and holds together without leaking.
- Edges are sealed tightly, no filling oozing out during baking.
Baked Samosas
Ingredients
Equipment
Method
- Start by boiling the potatoes in salted water until tender, about 15 minutes. Drain and mash until smooth, then set aside.
- While potatoes cook, toast cumin seeds in a skillet over medium heat until fragrant, about 30 seconds, then remove from heat.
- In the same skillet, add a teaspoon of oil and sauté the chopped onion until translucent, about 3-4 minutes. Stir in the toasted cumin seeds, garam masala, turmeric, and chili powder, cooking for another minute until fragrant.
- Mix the mashed potatoes and peas into the skillet, stirring well to combine all the spices evenly. Add lemon juice for brightness and season with salt to taste. Remove from heat and let the filling cool slightly.
- Preheat your oven to 200°C (390°F). Line a baking sheet with parchment paper or a silicone mat. Roll out the thawed puff pastry on a lightly floured surface to about 3 mm thick.
- Cut the pastry into rectangles or circles, about 8x8 cm (3x3 inches). Place about 1-2 tablespoons of filling on one side of each pastry piece.
- Fold each piece over the filling to form a triangle or semi-circle, then press and crimp the edges with a fork to seal tightly.
- Arrange the sealed samosas on the prepared baking sheet, leaving space between them. Brush the tops lightly with oil or beaten egg for a shiny, golden finish.
- Bake in the preheated oven for 20-25 minutes, until the crust is puffed, golden, and crispy. Check at 20 minutes and bake a few minutes longer if needed.
- Remove from the oven and let the samosas rest for 5 minutes. Serve warm with chutney or yogurt for dipping, enjoying the crispy, flaky exterior and flavorful filling.
Notes
Pro tips for perfect baked samosas
- Bolded mini-head: Chill the pastry dough before rolling—keeps it flaky and easy to handle.
- Bolded mini-head: Use a sharp knife or pastry cutter—ensures clean edges and less tearing.
- Bolded mini-head: Egg wash lightly—avoids over-browning and keeps crust tender, not greasy.
- Bolded mini-head: Bake at 200°C (390°F)—for a crisp, golden crust without burning.
- Bolded mini-head: Let samosas rest 5 minutes—sets the filling and prevents cracking when serving.
- Bolded mini-head: Use a silicone mat—prevents sticking and promotes even baking.
- Bolded mini-head: Seal edges well—press with a fork to keep filling inside during baking.
Common mistakes and how to fix them
- FORGOT to seal edges properly → Use a fork to crimp tightly, preventing filling leaks.
- DUMPED filling into oven → Bake at 200°C (390°F) until golden, not undercooked.
- OVER-TORCHED crust → Cover with foil if edges brown too quickly, bake until crisp.
- FAILED to preheat oven → Always preheat to ensure even baking and crisp crusts.
Quick fixes for baked samosas
- When samosas stick, splash a bit of water on the tray and bake for 2 more minutes to loosen.
- If the crust isn’t crisp enough, bump the oven to 220°C (430°F) and bake 3-5 minutes longer.
- Patch cracks by brushing with a little water and pressing pastry edges together before baking.
- DUMPED filling leaks out? Chill the assembled samosas for 10 minutes before baking to help seal the edges.
- Shield over-browned edges with foil if they turn dark too fast, then continue baking until golden.
Prep, store, and reheat tips
- Prep the filling a day ahead—store in an airtight container in the fridge; the flavors meld and deepen overnight, making assembly quicker on bake day.
- Assemble and shape samosas up to 24 hours in advance, then keep covered in the fridge; they stay fresh and prevent drying out.
- Bake the samosas and let them cool completely; store in an airtight container at room temperature for up to 1 day, or in the fridge for 2-3 days.
- Reheat in a 180°C (350°F) oven for 10-12 minutes until crisp and hot, shaking the tray halfway; the oven revives that freshly baked crunch.
- For best sensory results, avoid reheating in the microwave, which can make the pastry soggy and dull the spices’ aroma.
Top questions about baked samosas
1. How hot should the oven be?
Use a hot oven, around 200°C (390°F), for crispy, golden crusts. Keep an eye after 20 minutes.
2. How do I seal the samosas properly?
Seal the edges well with a fork to prevent filling leaks during baking. Moisture escapes easily if not sealed.
3. When are samosas done?
Bake until the crust is puffed and golden, about 20-25 minutes. The filling should be hot and fragrant.
4. Can I use different pastry types?
Use store-bought puff pastry for convenience, or homemade flaky dough if you prefer. Keep it cold to prevent tearing.
5. How should I reheat leftovers?
Reheat in a 180°C (350°F) oven for about 10 minutes until crisp. Avoid microwaving to keep the crunch.
6. Can I customize the filling?
Use frozen peas or fresh for a burst of sweetness. Adjust spices accordingly for balance.
7. What’s the best way to get a shiny crust?
Brush lightly with egg wash or plant-based milk for a shiny, golden crust. Too much can make them greasy.
8. How do I fix filling leakage?
Chill assembled samosas for 10 minutes if filling leaks or isn’t sealing well before baking.
9. Can I make the filling ahead of time?
Add a splash of lemon juice or vinegar to brighten flavors. Adjust seasoning to taste before filling.
10. How do I know when they’re perfectly baked?
Look for a crispy, puffed exterior with a slight crackle when tapped. Filling should be hot and fragrant.
Baked samosas remind me how simple swaps can make comfort food feel new again. The smell of toasted spices and flaky crust filling the kitchen is oddly grounding these days.
They’re quick to make, satisfying to eat, and a little bit nostalgic. Perfect for casual get-togethers or just when you need a cozy snack without the fuss of frying.

Hi, I’m Michael Anderson, the voice behind Overreacting To Salt. Yes, the name usually gets a laugh. And no, I am not actually afraid of salt. In fact, understanding salt and flavor balance is what inspired this entire blog.
 The voice behind Overreacting To Salt. Yes, the name usually gets a laugh. And no, I am not actually afraid of salt. In fact, understanding salt and flavor balance is what inspired this entire blog.
Overreacting To Salt is my space to talk honestly about cooking mistakes, kitchen wins, and the small details that make a big difference in flavor. I created it for home cooks who want to understand food better without feeling intimidated.
The voice behind Overreacting To Salt. Yes, the name usually gets a laugh. And no, I am not actually afraid of salt. In fact, understanding salt and flavor balance is what inspired this entire blog.
Overreacting To Salt is my space to talk honestly about cooking mistakes, kitchen wins, and the small details that make a big difference in flavor. I created it for home cooks who want to understand food better without feeling intimidated.


