These baked cheese balls are my go-to snack when I want something familiar but a little more refined. They remind me of childhood treats, crispy and gooey all at once, with a melt-in-your-mouth texture that’s hard to beat. Baking them instead of frying keeps them lighter, yet just as indulgent, with a golden crust that crackles invitingly with every bite.
I love how adaptable this recipe is—use whatever cheese you have on hand, from sharp cheddar to nutty Gruyère. The best part? The smell that fills the kitchen as they bake, a warm, cheesy aroma that pulls everyone in. It’s a simple pleasure, but one that feels like a small celebration every time I make them.
Focusing on the nostalgic comfort of childhood snacks, but elevating them with a sophisticated cheese blend and a crispy, golden baked finish.
The story behind this recipe
- This recipe actually comes from a chaotic night in my kitchen, trying to replicate a childhood favorite that my grandma used to make. I remember the smell of melting cheese filling the house, making everyone stop what they were doing just to peek in the oven. It’s funny how a simple snack can carry so much nostalgia and warmth.
- One evening, I decided to experiment with different cheeses and baking techniques, aiming for that perfect crispy outside and gooey inside. After several burnt batches and a lot of cheese-melting mishaps, I finally hit on a method that gives that satisfying crackle and tender bite. Now, these cheese balls are my go-to when I want comfort but with a little twist of pride.
- heading: The story behind this recipe
Ingredient breakdown: key components
- Cheddar cheese: I love using sharp cheddar for that punch of flavor, but feel free to mellow it with mozzarella if you prefer milder bites.
- Breadcrumbs: I opt for panko for extra crunch, but regular fresh breadcrumbs work if you want a softer crust—just watch the baking time.
- Egg: This binds everything together and helps the coating stick, but if you’re out, a little milk or yogurt can do the trick—just keep the mixture firm.
- Parmesan: Adds a salty umami kick and melts into the cheese, but you can skip it or swap for Pecorino for a different sharpness.
- Herbs & spices: I toss in a pinch of paprika and some chopped parsley for color and aroma—tweak according to your mood, but don’t skip the smoky paprika if you like a depth of flavor.
- Oil for brushing: Just a light coating before baking helps the crust turn golden and crisp, but a quick spray with cooking spray works too if you’re running low.
- Optional fillings: Sometimes I hide a tiny cube of ham or a bit of jalapeño inside—adds a surprise element, but keep it small to prevent the ball from falling apart.
Spotlight on key ingredients
Cheddar cheese:
- I love using sharp cheddar for that punch of flavor, but feel free to mellow it with mozzarella if you prefer milder bites.
- Breadcrumbs: I opt for panko for extra crunch, but regular fresh breadcrumbs work if you want a softer crust—just watch the baking time.
- Egg: This binds everything together and helps the coating stick, but if you’re out, a little milk or yogurt can do the trick—just keep the mixture firm.
Herbs & spices:
- I toss in a pinch of paprika and some chopped parsley for color and aroma—tweak according to your mood, but don’t skip the smoky paprika if you like a depth of flavor.
- Oil for brushing: Just a light coating before baking helps the crust turn golden and crisp, but a quick spray with cooking spray works too if you’re running low.
Notes for ingredient swaps
- Dairy-Free: Swap cheese for a blend of cashew cream and nutritional yeast. It won’t melt the same, but will still be cheesy in flavor.
- Gluten-Free: Use almond flour or crushed gluten-free crackers instead of panko breadcrumbs for a crunchy exterior.
- Vegan: Replace egg with flaxseed meal mixed with water and choose plant-based cheeses to keep it vegan-friendly.
- Spice Level: Add cayenne or chili powder instead of paprika if you like a fiery kick—just adjust quantity to taste.
- Herbs & Flavors: Fresh chives or basil can replace parsley for a different aromatic note, fresh and bright.
- Oil for Brushing: Use melted coconut oil or a light spray of olive oil—both will help achieve that golden crisp.
- Fillings: Insert small bits of cooked bacon or a tiny piece of pickle for surprise flavors—just keep the fillings small to avoid cracking.
Equipment & Tools
- Baking sheet: To hold the cheese balls during baking and ensure even heat distribution.
- Parchment paper or silicone mat: To prevent sticking and make cleanup easier.
- Mixing bowl: To combine all ingredients thoroughly.
- Spoon or scoop: To portion out the mixture evenly.
- Pastry brush or spray bottle: To lightly oil the tops of the cheese balls for even browning.
Step-by-step guide to baking cheese balls
- Preheat your oven to 200°C (390°F). Line a baking sheet with parchment paper or a silicone mat to prevent sticking.
- In a large mixing bowl, combine 1 cup grated cheddar cheese, 1/2 cup panko breadcrumbs, 1 beaten egg, 2 tablespoons grated Parmesan, and a pinch of smoked paprika. Mix until well integrated.
- Using your hands, scoop out about a tablespoon of the mixture and roll into a compact ball. Repeat until all mixture is used, about 12-15 balls.
- Place the cheese balls on the prepared baking sheet, spacing them about 2 inches apart. Lightly brush or spray the tops with oil to promote even browning.
- Bake in the preheated oven for 15-18 minutes. The tops should turn golden brown, and the cheese inside should be gooey and bubbling.
- Once baked, turn off the oven and let the cheese balls rest for 5 minutes. This helps the cheese set slightly and makes handling safer.
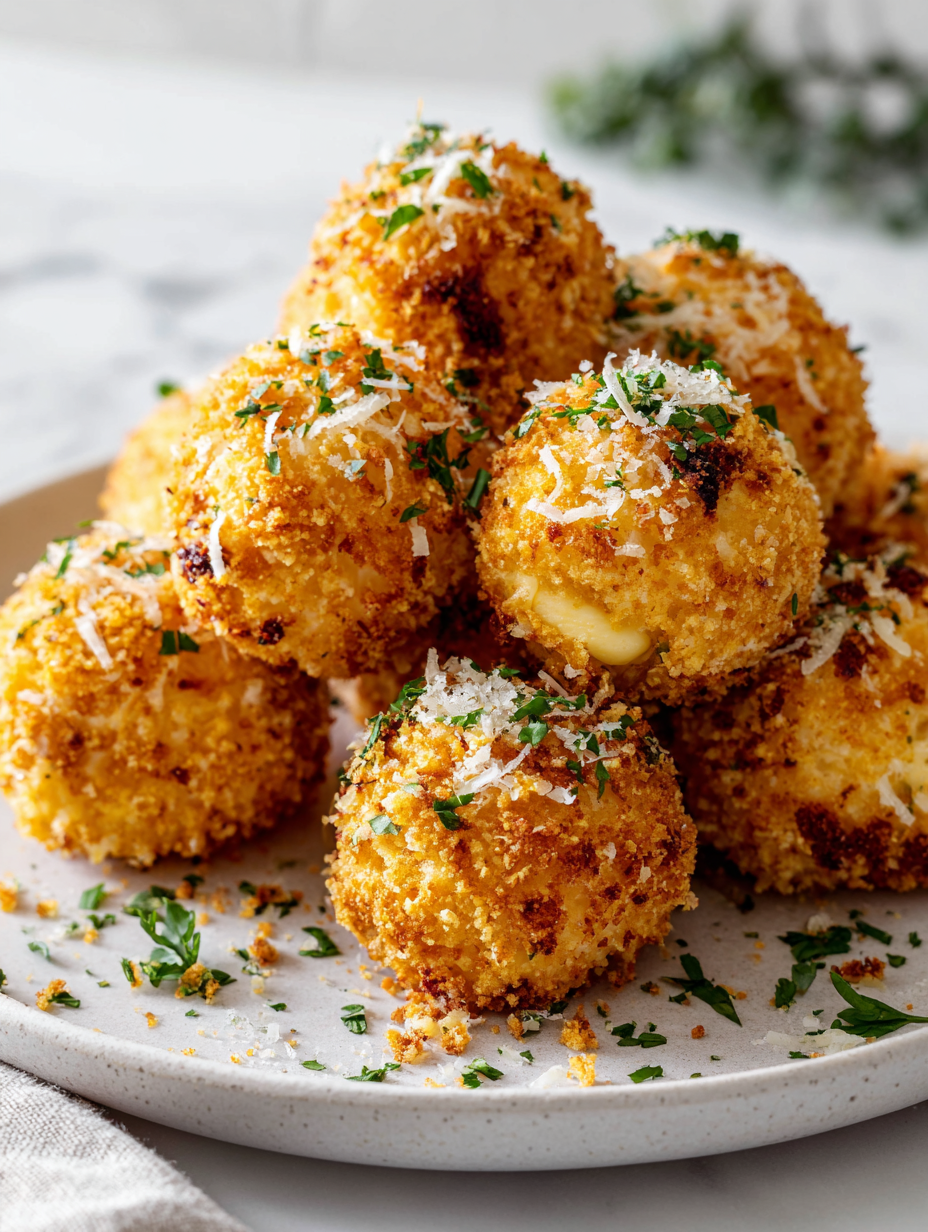
- Transfer the baked cheese balls to a serving plate. Serve warm, with any extra herbs or a drizzle of honey if desired. Enjoy the crispy outside and molten inside!
Allow the cheese balls to rest on the baking sheet for 5 minutes post-baking. Serve warm directly from the oven, perhaps with a sprinkle of fresh herbs or a dusting of extra Parmesan for presentation.
How to Know It’s Done
- Golden-brown crust with a slight crackle when pressed lightly.
- Cheese inside should be hot, gooey, and slightly molten, not runny.
- Even browning across all cheese balls, with no raw or overly dark patches.
Baked Cheese Balls
Ingredients
Equipment
Method
- Preheat your oven to 200°C (390°F) and line a baking sheet with parchment paper or a silicone mat. This helps prevent sticking and ensures easy cleanup.
- In a large mixing bowl, combine the grated cheddar cheese, panko breadcrumbs, grated Parmesan, smoked paprika, and a pinch of salt if desired. Mix until evenly distributed, creating a fragrant, crumbly mixture.
- Add the large egg to the bowl and stir thoroughly until the mixture becomes cohesive and slightly sticky. This will help it hold together when shaping.
- Using a tablespoon or a small scoop, portion out the mixture and gently roll into compact balls with your hands. Repeat until all the mixture is used, about 12-15 balls in total.
- Place the cheese balls on the prepared baking sheet, spacing them about 2 inches apart. Lightly brush or spray the tops with oil to promote even browning and crispness.
- Bake in the preheated oven for 15-18 minutes, or until the tops are golden brown and crispy. You’ll hear a gentle crackle as the crust forms and see the cheese bubbling inside.
- Once baked, remove the cheese balls from the oven and let them rest for 5 minutes. This allows the cheese to set slightly and makes them easier to handle.
- Transfer the cheese balls to a serving plate and serve warm. They should be crispy on the outside and gooey and cheesy inside, perfect for snacking or sharing.
Tips for perfect cheese balls
- Use cold cheese mixture to make rolling easier and keep the cheese firm during shaping.
- Chill the formed balls for 10 minutes before baking to help them hold their shape and improve texture.
- Brush or spray the cheese balls with oil just before baking for a shiny, golden crust and extra crispness.
- Bake at 200°C (390°F) until golden and bubbling; keep an eye to prevent over-browning or burning.
- Rest the cheese balls for 5 minutes after baking to let the cheese set slightly inside, avoiding messes on serving.
- For an extra crispy exterior, broil for the last 2 minutes—watch carefully to prevent burning.
- Serve immediately while hot and gooey, but if you need to reheat, warm in the oven at 180°C (350°F) for 5–7 minutes.
Common mistakes and how to fix them
- FORGOT to preheat oven → Always preheat for even cooking and better texture.
- DUMPED cheese mixture → Keep mixture chilled if too soft; refrigerate for 15 minutes.
- OVER-TORCHED cheese balls → Reduce oven temp or check earlier; aim for golden, not burnt.
- FAILED to space balls properly → Space evenly to prevent sticking and ensure crisp edges.
Quick fixes and pantry swaps
- If cheese mixture feels too soft, splash in a little more breadcrumbs to firm it up.
- When cheese balls stick to your hands, dampen them slightly to prevent sticking and make shaping easier.
- Splash a few drops of water on the baking sheet if cheese balls start to crackle excessively in the oven.
- Patch a burnt crust by covering with foil and lowering the oven temperature for the remaining minutes.
- Shield cheese balls with foil if they brown too quickly before the inside melts completely.
Prep, store, and reheat tips
- You can prepare the cheese mixture a day ahead; keep it refrigerated in an airtight container to maintain freshness and prevent dryness.
- Assemble and shape the cheese balls up to 2 hours before baking; store them loosely covered in the fridge to keep their shape intact.
- Bake the cheese balls and let them cool completely; store in an airtight container in the fridge for up to 24 hours, where they will stay crispy on the outside but may soften slightly inside.
- Reheat in a 180°C (350°F) oven for about 5–7 minutes until warmed through and the exterior regains a slight crunch. Sensory cue: smell the cheesy aroma and listen for a gentle crackle.
Top questions about baked cheese balls
1. Can I use different cheeses?
Use a mild, melty cheese like mozzarella or a blend for gooey texture. Sharp cheeses add more punch but may be crumblier.
2. Can I make these in advance?
Yes, you can prepare the mixture up to a day ahead. Keep it refrigerated and shape before baking.
3. How do I know when they’re done?
Bake until they are golden on top and the cheese inside is bubbling and hot. About 15-18 minutes at 200°C (390°F).
4. What if they burn or brown unevenly?
If they brown too quickly, lower the oven temperature slightly or cover with foil. For a crispier crust, broil for a minute at the end.
5. Can I substitute the breadcrumbs?
Use panko breadcrumbs for extra crunch, or regular breadcrumbs for a softer crust. Adjust baking time accordingly.
6. Are there gluten-free options?
Yes, substitute with gluten-free options like crushed nuts or gluten-free crackers for a crunchy exterior.
7. What oven temperature should I use?
Bake in a preheated oven at 200°C (390°F). Keep an eye on them, and remove when golden and bubbling.
8. My mixture is too soft to roll?
If mixture feels too soft, chill it for 10-15 minutes. Wet hands slightly when shaping to prevent sticking.
9. How do I reheat leftovers?
Reheat baked cheese balls in a 180°C (350°F) oven for 5-7 minutes. They should be hot and crispy on the outside.
10. How do I get the crust crispy?
Use a light spray of oil or brushing with oil before baking to get a beautiful golden, crispy crust.
These baked cheese balls are more than just a snack; they carry a little piece of childhood nostalgia, elevated with a crispy exterior and molten cheese inside. Making them reminds me of those cozy nights when the kitchen fills with warm, cheesy aromas that make everyone gather around. It’s a simple, honest treat that feels like a small celebration every time I bake them.
Whenever I serve these, I’m reminded how a handful of good ingredients and a bit of patience can create something truly satisfying. They’re perfect for casual get-togethers or just a quiet moment of comfort. No matter the occasion, they never fail to bring a little joy to the table.

Hi, I’m Michael Anderson, the voice behind Overreacting To Salt. Yes, the name usually gets a laugh. And no, I am not actually afraid of salt. In fact, understanding salt and flavor balance is what inspired this entire blog.
 The voice behind Overreacting To Salt. Yes, the name usually gets a laugh. And no, I am not actually afraid of salt. In fact, understanding salt and flavor balance is what inspired this entire blog.
Overreacting To Salt is my space to talk honestly about cooking mistakes, kitchen wins, and the small details that make a big difference in flavor. I created it for home cooks who want to understand food better without feeling intimidated.
The voice behind Overreacting To Salt. Yes, the name usually gets a laugh. And no, I am not actually afraid of salt. In fact, understanding salt and flavor balance is what inspired this entire blog.
Overreacting To Salt is my space to talk honestly about cooking mistakes, kitchen wins, and the small details that make a big difference in flavor. I created it for home cooks who want to understand food better without feeling intimidated.


