Baking mozzarella sticks might seem unconventional, but it’s a game changer. No more greasy hands or lingering oil smells—just crisp, cheesy goodness that’s easier to make and cleaner to eat. Plus, the oven’s gentle heat creates a more even, golden crust that stays crispy longer.
This approach is perfect for those nights when you crave comfort food but want to skip the deep-fry chaos. It’s a straightforward method that keeps the cheese oozy and melty inside, without the mess or excess oil. Honestly, once you try baked mozzarella sticks, fried just feels so last season.
I’ve always loved how mozzarella sticks remind me of childhood snack bars, but baking them adds a fresh twist. It’s a simple way to upgrade a classic, making it feel a little healthier without losing that satisfying crunch and gooey cheese pull. Sometimes, the oven just knows how to do the magic better.
Focusing on how baking mozzarella sticks transforms their texture, making them less greasy and more evenly crispy, unlike traditional fried versions.
The story behind this recipe
- I stumbled on this baked version during a busy week when deep-frying wasn’t an option, but I still wanted that satisfying cheesy crunch. It’s become my go-to for a quick appetizer or snack that feels indulgent without the usual oil slick. The first time I pulled these out of the oven, the aroma of bubbling cheese and toasted breadcrumbs made me smile—nostalgia with less mess.
- There’s something about baking mozzarella sticks that turns them into a more controlled, less greasy treat. I love how the oven’s gentle heat crisps up the coating evenly, while the cheese stays gooey inside. It’s a small tweak that’s changed my snack game—less fuss, more flavor, cleaner kitchen.
- heading: ‘The story behind this recipe’
Key ingredients and tips
- Mozzarella sticks: I prefer using block mozzarella for a fresher, stretchier melt—buy a good quality one, it really shows when melted and gooey.
- Breadcrumbs: Panko give that extra crunch and lightness; skip the seasoned kind if you want to control the salt and spice, or add your own herbs for a personal touch.
- Egg wash: Whisked eggs help the coating stick, but if you want a crispier finish, add a splash of milk or water—just enough to loosen it up.
- Flour: I keep it simple with all-purpose flour, but a touch of cornstarch in the mix can boost crispiness—think of it as a little secret for extra crunch.
- Oil spray: Use a light misting of neutral oil or cooking spray on the coated sticks before baking—this helps them turn a golden, crackly brown, not dull or pale.
- Seasonings: A pinch of garlic powder, smoked paprika, or Italian herbs in the breadcrumb mix elevates the flavor—go wild if you like bold bites!
- Optional cheese: For extra cheesy sticks, sprinkle a little grated Parmesan or Romano into the breadcrumb mix—adds depth and umami that makes a difference.
Spotlight on key ingredients
Mozzarella:
- Mozzarella sticks: I prefer using block mozzarella for a fresher, stretchier melt—buy a good quality one, it really shows when melted and gooey.
- Breadcrumbs: Panko give that extra crunch and lightness; skip the seasoned kind if you want to control the salt and spice, or add your own herbs for a personal touch.
- Egg wash: Whisked eggs help the coating stick, but if you want a crispier finish, add a splash of milk or water—just enough to loosen it up.
Breadcrumbs:
- I love how panko creates a super crisp exterior, almost like fried but baked—light, airy, and golden.
- Seasonings: Adding garlic powder or smoked paprika to the breadcrumbs really boosts flavor—smells amazing as they toast in the oven.
- Oil spray: A light mist of neutral oil makes the crust turn crackly and beautiful, not dull or pale.
Notes for ingredient swaps
- Dairy-Free: Use cashew or soy-based cheese alternatives. They melt differently and might be less oozy, but still satisfy that cheesy craving.
- Gluten-Free: Swap regular breadcrumbs for almond meal or gluten-free panko. Expect a slightly denser crunch and a nuttier flavor.
- Vegan: Replace cheese with vegan mozzarella and eggs with a flaxseed or chia seed egg wash. The texture will be a bit different but still tasty.
- Low-Sodium: Choose unsalted or low-sodium cheese and breadcrumbs. Adjust seasonings to taste without the salt punch.
- Herb Variations: Add fresh herbs like basil or oregano to the breadcrumb mix for a burst of freshness and aroma.
- Spicy Kick: Mix in cayenne or chili powder with the breadcrumbs to add some heat. The cheese stays mellow, but the coating gets fiery.
- Extra Crunch: Use crushed cornflakes instead of panko for an even crispier coating with a unique texture.
Equipment & Tools
- Baking sheet: To hold the mozzarella sticks during baking
- Parchment paper or silicone mat: To prevent sticking and ease cleanup
- Three shallow dishes: For flour, eggs, and breadcrumb coating stations
- Mixing bowls: To prepare and hold ingredients
- Cooking spray or oil mister: To lightly coat sticks for crispiness
Step-by-step guide to baked mozzarella sticks
- Preheat your oven to 200°C (392°F). Line a baking sheet with parchment paper or a silicone mat for easy cleanup.
- Prepare the coating stations: In a shallow dish, place flour. In another, beat 2 eggs. In a third, combine panko breadcrumbs with seasonings like garlic powder, paprika, and a pinch of salt.
- Cut mozzarella into sticks about 10 cm (4 inches) long and 1 cm (0.4 inches) thick. Keep cold until ready.
- Dredge each mozzarella stick first in flour, shaking off excess. Then dip into the beaten eggs, allowing excess to drip off.
- Finally, coat thoroughly in the seasoned panko breadcrumbs, pressing lightly to adhere. For extra crunch, double coat: dip again in egg and breadcrumbs.
- Place coated mozzarella sticks on the prepared baking sheet, spacing them well. Lightly spray or drizzle with neutral oil or cooking spray for a golden finish.
- Bake in the preheated oven for 8-10 minutes. Check for a golden crust and melted cheese starting at 8 minutes.
- Once baked, remove from oven and let rest for 2 minutes to set the cheese slightly. Serve immediately with your favorite dipping sauces.
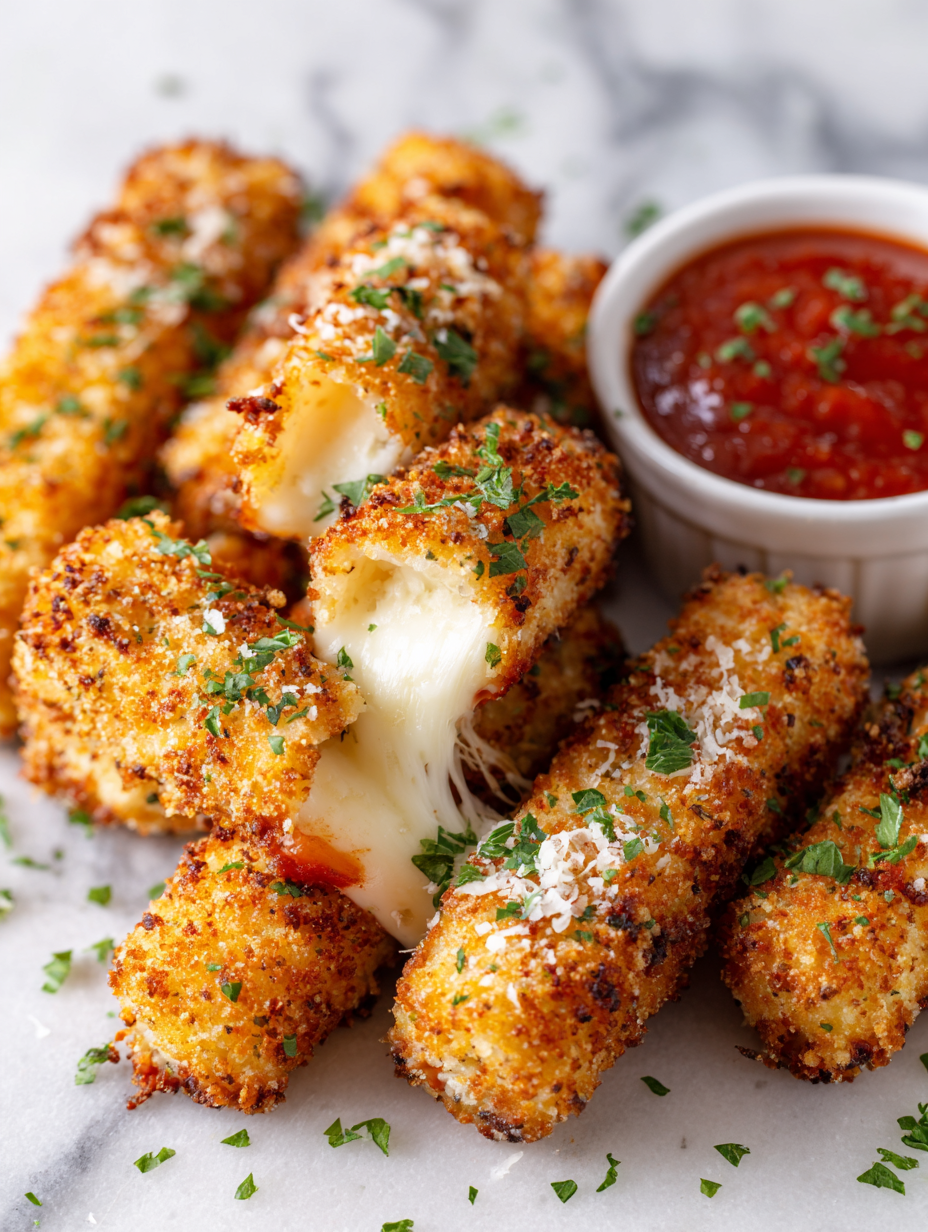
Let the mozzarella sticks rest for 2 minutes after baking. Serve hot with marinara, ranch, or your favorite dip for maximum gooeyness and crunch.
How to Know It’s Done
- Crust is golden and crispy, not pale or dull.
- Cheese inside is melted and gooey, not firm or cold.
- Coating stays intact without excessive cracking or falling off.
Baked Mozzarella Sticks
Ingredients
Equipment
Method
- Start by cutting the block mozzarella into four equal sticks about 10 cm long and 1 cm thick, keeping them cold until ready to coat.
- Set up three shallow dishes: one with flour, one with beaten eggs, and the third with panko breadcrumbs mixed with garlic powder, paprika, salt, and pepper.
- Dredge each mozzarella stick in the flour, making sure it’s fully coated and shaking off any excess.
- Next, dip the floured stick into the beaten eggs, allowing any excess to drip off gently.
- Finally, coat the stick thoroughly in the seasoned panko breadcrumbs, pressing lightly to ensure it sticks well. For extra crunch, repeat the egg and breadcrumb step for a double coat.
- Place the coated sticks on a baking sheet lined with parchment or a silicone mat, spacing them evenly. Lightly spray or mist with neutral oil for a golden, crispy crust.
- Bake in a preheated oven at 200°C (392°F) for 8-10 minutes, until the crust is golden brown and crispy, and the cheese inside is starting to melt.
- Remove from the oven and let the mozzarella sticks rest for 2 minutes, allowing the cheese to set slightly and making them easier to handle.
- Serve immediately with your favorite dipping sauces like marinara or ranch for maximum gooeyness and crunch.
Pro tips for perfect baked mozzarella sticks
- coating: Press breadcrumbs firmly onto mozzarella for a thick, crunchy crust that won’t fall off during baking.
- Cool before baking: Chill coated sticks for 10 minutes to help the breadcrumb layer set and prevent cheese leakage.
- Even spacing: Arrange sticks with space between on the baking sheet to promote uniform crisping and air circulation.
- Mist for color: Lightly spray with oil before baking to encourage a golden, crackly finish without excess greasiness.
- Bake at high heat: 200°C (392°F) ensures crispy coating without overcooking the cheese inside.
- Watch the color: Remove once the crust is deeply golden and crispy to avoid overbaking and cheese meltdown.
- Serve immediately: These are best enjoyed hot, when the cheese is gooey and the crust is still crisp and fresh.
Common mistakes and how to fix them
- FORGOT to preheat the oven → Always start with a hot oven to ensure even crisping.
- DUMPED the coating too early → Fully coat and press breadcrumbs onto sticks for even crunch.
- OVER-TORCHED the mozzarella → Remove when golden; cheese should be melted and gooey inside.
- MISSED the resting step → Let sticks rest 2 minutes before serving for cheese to set.
Quick fixes and pantry swaps
- When oil shimmer turns dull, splash a little more oil to revive crispness.
- If cheese leaks during baking, chill sticks 10 minutes before coating again.
- DUMPED the breadcrumbs unevenly? Patch with a quick spray of oil and sprinkle extra crumbs.
- When sticks stick to the pan, shield with parchment paper or a silicone mat for easy removal.
- Splash a bit of water on the baking sheet if sticks start to brown too fast—shimmering surface calms the heat.
Prep, store, and reheat tips
- Prep the mozzarella sticks: coat and bread them up to a day in advance, then keep covered in the fridge. Cheesy, crispy goodness waits for baking.
- Store baked or unbaked sticks in an airtight container in the fridge for up to 24 hours. Reheat for a fresh-out-of-the-oven feel.
- Freeze unbaked coated sticks for up to 2 months; place on a tray first, then transfer to a bag. Bake directly from frozen—just add a couple of extra minutes.
- Reheat baked mozzarella sticks in a 180°C (356°F) oven for 5-7 minutes. Expect that crackly crust and gooey cheese to come back to life with a gentle, inviting aroma.
- For best flavor and texture, avoid reheating in the microwave, which can make the coating soggy and cheese rubbery. Instead, go oven or toaster oven for that crisp bite.
Top questions about baked mozzarella sticks
1. How do I know when they are done?
Bake until the coating is golden and crispy, about 8-10 minutes at 200°C (392°F).
2. What should the crust look and feel like?
Look for an even, deep golden crust and check that cheese inside is gooey and melted.
3. How can I get a crispier coating?
Use a light spray of oil before baking to help achieve a crackly, golden shell.
4. Why should I rest the mozzarella sticks?
Let the sticks rest for 2 minutes after baking to prevent cheese from escaping when you bite.
5. Can I prepare these in advance?
Chill coated sticks for 10 minutes before baking to help the breadcrumb layer set and prevent cheese leakage.
6. Can I freeze baked or unbaked mozzarella sticks?
Yes, you can freeze unbaked sticks for up to 2 months. Bake directly from frozen, adding a couple of extra minutes.
7. How do I reheat leftovers?
Reheat in a 180°C (356°F) oven for 5-7 minutes until crispy and hot inside.
8. Is microwave reheating okay?
Avoid microwaving, as it makes the coating soggy and cheese rubbery. Use oven or toaster oven instead.
9. What breadcrumb should I use?
Use panko breadcrumbs for a lighter, crunchier texture and add seasonings like garlic or paprika for flavor.
10. Any tips for coating the cheese properly?
Ensure the cheese is cold when coating and keep the coated sticks chilled before baking for best results.
These baked mozzarella sticks bring a nostalgic crunch with less fuss and mess. They’re perfect for quick snacks or casual gatherings, especially when you want something cheesy and satisfying without deep-frying chaos.
Once you get the hang of the coating process, they come together fast and crispy every time. Serve them hot, with a drizzle of marinara or a squeeze of lemon for a fresh, tangy finish. It’s a simple, honest way to upgrade a classic snack.

Hi, I’m Michael Anderson, the voice behind Overreacting To Salt. Yes, the name usually gets a laugh. And no, I am not actually afraid of salt. In fact, understanding salt and flavor balance is what inspired this entire blog.
 The voice behind Overreacting To Salt. Yes, the name usually gets a laugh. And no, I am not actually afraid of salt. In fact, understanding salt and flavor balance is what inspired this entire blog.
Overreacting To Salt is my space to talk honestly about cooking mistakes, kitchen wins, and the small details that make a big difference in flavor. I created it for home cooks who want to understand food better without feeling intimidated.
The voice behind Overreacting To Salt. Yes, the name usually gets a laugh. And no, I am not actually afraid of salt. In fact, understanding salt and flavor balance is what inspired this entire blog.
Overreacting To Salt is my space to talk honestly about cooking mistakes, kitchen wins, and the small details that make a big difference in flavor. I created it for home cooks who want to understand food better without feeling intimidated.


