These mini sliders are a little celebration in every bite, especially because I make the buns from scratch. Instead of the usual sandwich bread, I love using flaky, buttery biscuits that hold all those juicy fillings perfectly. It’s my way of turning a simple snack into a small, satisfying project that feels like a treat.
What makes these sliders special isn’t just the homemade buns, but the joy of mixing and shaping them myself. There’s something about pulling a warm, golden biscuit from the oven, smelling that rich butter and flour aroma, that just makes everything feel more personal. Plus, they’re perfect for sharing, whether at a weekend brunch or a casual get-together.
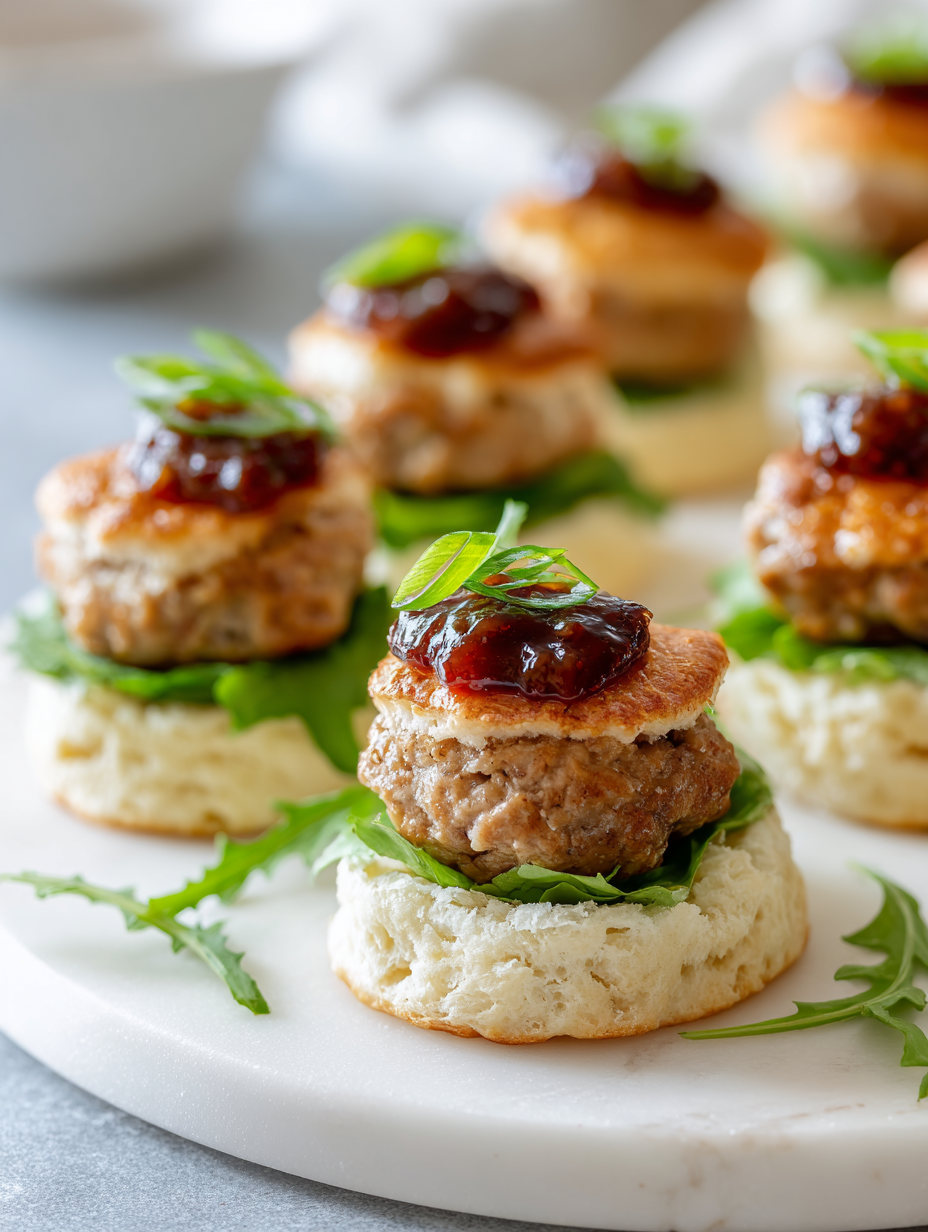
Focusing on creating miniature sliders with a homemade, flaky biscuit bun instead of traditional bread, emphasizing the joy of DIY baking and the contrast of flaky texture with juicy patties.
Baking Flaky Biscuits from Scratch
- Making these sliders from scratch feels like reclaiming childhood joy, especially when that buttery biscuit aroma fills the kitchen.
- I love how a tiny slider can carry so much flavor—it’s chaos on a plate but totally worth the mess.
- Sharing these mini bites at a summer BBQ brings back memories of simpler times, full of laughter and greasy fingers.
- There’s pride in shaping each biscuit bun, knowing they’ll be the cozy cradle for that perfectly seasoned patty.
- Sometimes I get a little carried away with toppings, but honestly, that’s part of the fun—creative chaos.
The story behind this recipe
- This recipe came together on a lazy Sunday when I was craving something small and satisfying, but with a little twist of homemade comfort. I remembered those summer barbecues at my grandparents’ place, where tiny burgers and crispy fries filled the air with a sense of carefree joy. I wanted to recreate that feel—simple, honest, and a little nostalgic—focusing on the joy of making everything from scratch, even the buns.
- The idea of shaping my own mini buns from flaky dough struck me as a fun challenge, a way to elevate a casual bite into something memorable. There’s something satisfying about pulling warm, golden biscuits from the oven, smelling that buttery aroma, knowing I baked them myself. These sliders aren’t just food; they’re a small act of love, meant to be shared and savored slowly.
- heading: ‘The story behind this recipe’
Historical & Cultural Trivia
- Mini sliders gained popularity in the 1980s as a party finger food, making social snacking more casual and fun.
- The term ‘slider’ supposedly comes from sailors in the 1930s, who called small, greasy burgers ‘sliders’ because they would slide right down.
- Originally, sliders were made with leftover burger patties, repurposed into tiny, portable bites for quick eating on the go.
- The concept of a mini sandwich has roots in European tapas and small plate traditions, adapted for American casual dining.
Ingredient breakdown: key components
- Ground beef: I prefer a mix of chuck and sirloin for flavor and juiciness. If you want leaner, try turkey, but watch out for dryness.
- Mini buns: I bake my own flaky biscuits—they’re buttery and soft with a crisp edge. Store-bought can work, but they won’t have the same flaky bite.
- Cheese slices: Sharp cheddar melts beautifully, adding a rich tang. For a milder taste, go for mozzarella or Monterey Jack.
- Onions: Caramelized onions add sweetness and depth. Use red or yellow, and cook them slowly until they’re golden and sweet.
- Pickles: Bright, tangy crunch that cuts through the richness. Dill pickles are classic, but bread-and-butter add a sweet note if you prefer.
- Condiments: Mustard and ketchup are my go-to, but a dollop of spicy aioli can elevate the flavor punch. Use what makes you happy.
- Lettuce: Crisp leaf lettuce adds freshness and crunch. Romaine or butter lettuce both work well, just make sure they’re fresh and firm.
Spotlight on key ingredients
Ground beef:
- I prefer a mix of chuck and sirloin for flavor and juiciness. If you want leaner, try turkey, but watch out for dryness.
- Mini buns: I bake my own flaky biscuits—they’re buttery and soft with a crisp edge. Store-bought can work, but they won’t have the same flaky bite.
- Cheese slices: Sharp cheddar melts beautifully, adding a rich tang. For a milder taste, go for mozzarella or Monterey Jack.
Mini buns:
- I bake my own flaky biscuits—they’re buttery and soft with a crisp edge. Store-bought can work, but they won’t have the same flaky bite.
- Cheese slices: Sharp cheddar melts beautifully, adding a rich tang. For a milder taste, go for mozzarella or Monterey Jack.
Notes for ingredient swaps
- Dairy-Free: Swap regular milk or buttermilk with almond or oat milk. The biscuits might be slightly less tender, but still tasty.
- Gluten-Free: Use a 1:1 gluten-free baking flour blend. Expect a denser texture, but still flaky and satisfying.
- Lower-Sodium: Choose low-sodium baking powder and salt. Your biscuits will be less salty but still flavorful.
- Vegan: Replace butter with coconut oil or vegan margarine, and use plant-based milk. The texture stays rich, just a touch different.
- Cheese: Use a sharp cheddar for a bold melt, or try a smoky gouda for an unexpected twist. The flavor will shift accordingly.
- Meat: For a leaner slider, swap beef for turkey or chicken patties. They cook faster and are lighter, but may be less juicy.
- Sweet Option: For a fun twist, try a cinnamon-sugar biscuit and a sweet topping like honey or fruit preserves.
Equipment & Tools
- Large mixing bowl: Combine dry ingredients and mix dough.
- Pastry cutter or fingers: Cut in butter until crumbly.
- Measuring cups and spoons: Ensure precise ingredient measurements.
- Rolling pin: Flatten dough evenly.
- 2-inch round cutter: Cut out biscuit rounds.
- Baking sheet: Bake biscuits.
- Skillet or frying pan: Cook beef patties.
- Spatula: Flip patties and remove from pan.
- Thermometer: Check internal temperature of patties.
Step-by-step guide to mini sliders
- Gather all ingredients and equipment. Preheat your oven to 200°C (390°F).
- Mix 2 cups all-purpose flour, 1 tbsp baking powder, 1 tsp salt, and 1/4 cup sugar in a large bowl. Whisk together until well combined.
- Cut in 1/2 cup cold unsalted butter using a pastry cutter or fingers until the mixture resembles coarse crumbs. You want small pea-sized bits.
- Add 3/4 cup buttermilk gradually, stirring gently until the dough just comes together. Be careful not to overmix; it should be slightly shaggy.
- Turn dough onto a floured surface. Gently knead 3-4 times until cohesive. Pat into a 1-inch thick rectangle.
- Use a 2-inch round cutter to cut out biscuits. Gather scraps and reroll once, but no more to keep biscuits tender.
- Place biscuits on a parchment-lined baking sheet, spaced about 1 inch apart. Brush tops with melted butter for extra shine.
- Bake for 12-15 minutes or until golden and flaky. Keep an eye on them—ovens vary, but they should smell buttery and be puffed.
- While biscuits bake, prepare your patties: form 1/4 lb beef portions into small, flat discs. Season generously with salt and pepper.
- Heat a large skillet over medium-high heat (about 180°C/356°F). Add a splash of oil. When shimmering, add patties.
- Cook 3-4 minutes per side. Flip once you see a deep brown crust forming. Check for an internal temp of 70°C (160°F) for safety.
- In the last minute, add cheese slices on top of each patty. Cover briefly to melt, about 30 seconds, until cheese is gooey.
- Remove biscuits from oven and let cool slightly. Slice in half horizontally if desired, or serve whole as mini buns.
- Assemble sliders: bottom biscuit, patty with melted cheese, caramelized onions if you like, pickles, then top biscuit.
- Serve immediately or keep warm wrapped in a clean towel if making ahead.
Let biscuits cool for 5 minutes. Assemble sliders immediately while warm. Serve with a side salad or chips for a casual bite.
How to Know It’s Done
- Biscuits are golden and flaky, with a slight sheen from butter.
- Patties are deeply browned, with juices running clear and cheese melted.
- Internal temperature of patties reaches 70°C (160°F).
Mini Slider Biscuits with Juicy Patties
Ingredients
Equipment
Method
- Preheat your oven to 200°C (390°F). In a large mixing bowl, whisk together the flour, baking powder, salt, and sugar until evenly combined.
- Add the cold, cubed butter to the flour mixture. Use a pastry cutter or your fingers to cut in the butter until the mixture resembles coarse crumbs with small pea-sized bits.
- Gradually pour in the cold buttermilk, gently stirring with a fork until the dough just comes together. Be careful not to overmix; it should be slightly shaggy and soft.
- Turn the dough onto a floured surface and knead gently 3-4 times to bring it together. Pat the dough into a 1-inch thick rectangle.
- Use a 2-inch round cutter to cut out biscuits. Gather the scraps, reroll once, and cut out remaining biscuits. Place them on a parchment-lined baking sheet, spacing about 1 inch apart.
- Brush the tops of the biscuits with melted butter for a shiny, golden finish. Bake in the preheated oven for 12-15 minutes, or until they are puffed and golden brown.
- While the biscuits bake, form small, flat beef patties about 1/4 pound each. Season generously with salt and pepper.
- Heat a skillet over medium-high heat until shimmering. Cook the patties for 3-4 minutes per side until they develop a deep crust and reach an internal temperature of 70°C (160°F). Add cheese slices during the last minute to melt.
- Remove the biscuits from the oven and let them cool slightly. Slice each biscuit horizontally if desired, or serve whole as mini buns.
- Assemble each slider by placing a beef patty on the bottom biscuit, topping with caramelized onions, pickles, and a dollop of mustard and ketchup. Cover with the top biscuit.
- Serve immediately while warm, or keep warm wrapped in a towel for a few minutes before enjoying these delightful, flaky mini sliders.
Notes
Pro tips for perfect sliders
- Chill your butter before cutting in. It creates a flaky, tender crumb that melts in your mouth.
- Use a light hand when mixing the dough. Overworking makes biscuits tough and dense, not flaky.
- Brush the tops with melted butter before baking. It gives a shiny, golden crust and extra flavor.
- Don’t open the oven door early. Biscuits need steady heat to rise tall and light, about 12-15 minutes at 200°C (390°F).
- For a crispier crust, bake a minute longer, but watch that they don’t burn. The smell should be rich and buttery.
- When cooking patties, don’t press down with the spatula. Let the heat do the work for juicy, evenly cooked meat.
- Rest the sliders for a few minutes after baking. It helps juices redistribute and keeps everything juicy and flavorful.
Common mistakes and how to fix them
- FORGOT to check oven temperature → Use an oven thermometer for accuracy.
- DUMPED ingredients in all at once → Add liquids gradually for better dough texture.
- OVER-TORCHED the patties → Cook over medium heat, 180°C (356°F), for even browning.
- MISSED resting time → Let sliders rest 2 minutes before serving to lock in juices.
Quick fixes and pantry swaps
- When sauce is too thick, splash in a bit of water and stir gently to loosen.
- If buns are underbaked, patch with foil and bake 2-3 minutes longer until golden.
- Splash extra oil when patties stick; shield with a lid or flip gently to prevent breaking.
- When cheese isn’t melting, increase heat slightly or cover pan briefly for steam.
- DUMPED too much salt? Rinse the meat briefly before forming patties to tone down the flavor.
Prep, store, and reheat tips
- Prepare the biscuit dough and cut out biscuits up to a day in advance; keep them covered in the fridge to maintain freshness and prevent drying out.
- Cook the beef patties ahead of time, then store in an airtight container in the fridge for up to 24 hours; reheat in a skillet or microwave until just warmed, observing for a slight sizzle or steam.
- Caramelize onions and store in a sealed container in the fridge for 2-3 days; reheat until soft and fragrant, adding a splash of water if they dry out.
- Assemble sliders just before serving to keep the buns flaky and the patties juicy; if made ahead, store components separately and put together right before eating.
- Reheat assembled sliders in a warm oven at 180°C (356°F) for about 5 minutes; the bread should be crisp on the outside and fillings piping hot, with melted cheese and fragrant onions.
Top questions about mini sliders
1. How should I cut the biscuits without squishing them?
Use a sharp knife to cut the buns for clean, even slices that don’t crush the flaky layers.
2. How do I know when the burger patties are done?
Cook the patties over medium-high heat until they develop a deep brown crust and juices run clear, about 3-4 minutes per side.
3. What’s the best way to reheat sliders without losing their texture?
Reheat assembled sliders in a warm oven at 180°C (356°F) for about 5 minutes, until cheese is gooey and buns are crispy.
4. Why are my biscuits dense and how can I fix it?
If the biscuits turn out dense, don’t overmix the dough, and keep the butter cold to help create flaky layers.
5. How do I get my pickles extra crispy on the sliders?
Use freshly sliced pickles for crispness and vibrant flavor—dull, soggy pickles won’t add that satisfying crunch.
6. Any tips for flavorful toppings on mini sliders?
To make the sliders more flavorful, add caramelized onions or a spicy aioli—these toppings pack a punch and elevate the taste.
7. Why isn’t my cheese melting properly?
If the cheese isn’t melting, cover the pan for 30 seconds to trap steam, or turn down heat slightly to prevent burning.
8. How do I keep the biscuits flaky instead of tough?
Use a floured surface and gentle kneading to keep the dough tender and flaky, avoiding overworking which toughens the biscuits.
9. Can I prepare parts of the sliders ahead of time?
Store the cooked patties and biscuits separately in airtight containers; reassemble just before serving to keep everything fresh and crispy.
10. What are sensory cues that my sliders are done?
When the patties crackle and the buns smell buttery, it’s a sign they’re perfectly cooked and ready to enjoy.
These mini sliders, with their flaky biscuit buns and juicy patties, remind me how simple pleasures can be so satisfying. They’re perfect for turning a casual gathering into a little celebration of home-cooked fun. Plus, they’re a reminder that sometimes, the best bites come from a bit of honest effort in the kitchen.
Whenever I make these, I feel a little pride in the messy joy of baking from scratch and the flavors that come from doing things myself. It’s not about perfection but about enjoying the process and sharing something warm and real. And honestly, that’s what makes these sliders worth coming back to—they’re honest, flavorful, and a little bit of a messy delight.

Hi, I’m Michael Anderson, the voice behind Overreacting To Salt. Yes, the name usually gets a laugh. And no, I am not actually afraid of salt. In fact, understanding salt and flavor balance is what inspired this entire blog.
 The voice behind Overreacting To Salt. Yes, the name usually gets a laugh. And no, I am not actually afraid of salt. In fact, understanding salt and flavor balance is what inspired this entire blog.
Overreacting To Salt is my space to talk honestly about cooking mistakes, kitchen wins, and the small details that make a big difference in flavor. I created it for home cooks who want to understand food better without feeling intimidated.
The voice behind Overreacting To Salt. Yes, the name usually gets a laugh. And no, I am not actually afraid of salt. In fact, understanding salt and flavor balance is what inspired this entire blog.
Overreacting To Salt is my space to talk honestly about cooking mistakes, kitchen wins, and the small details that make a big difference in flavor. I created it for home cooks who want to understand food better without feeling intimidated.


